skip to main |
skip to sidebar
 Friday, February 05, 2010 - FULL
Time: 7:00 p.m. - 11:00 p.m. Cost: $20.00
For my calendar workshop this year I have made a few changes. Instead of meeting every month, we are meeting every second month and doing two calendar months at each workshop. The cost for the workshop is $20.00 per calendar month. Payment for the calendar workshop is $60.00 every three months. There are still four spots available for this workshop.
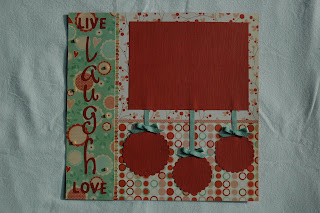
We are using the My Mind's Eye Be-Loved Two Sided Paper Line: Smitten Stripes, Desirable Dots, Beautiful Branches & Affectionate Flowers with Red Rock Bazzill Paper.
The title for this layout was outlined & cut-out with the Cricut machine using the Pooh Font Set, the Wild Card & Lyrical Letters cartridges. We will be cutting out our photos with the Marvy Mega & Super Jumbo circle punches and matting them with the Marvy Giga & Mega scalloped circle punches. One of the borders on the layout will be cut out using the EK Success Postage Stamp border punch.
The embellishments used on this page are Stampin' Up's Sage Shadow Grosgrain Ribbon and Stamping Bella's 5mm Solid Peaches & Cream Dots.
Photo sizes are: one horizontal 5x7 photo, two photos that a 2 inch circle can be cut out of & one photo that a 2.5 inch circle can be cut out of.

 Wednesday, February 10, 2010 - FULL
Time: 7:00 p.m. Cost: $7.00
Okay, I know that a St. Patrick's Day isn't one of the most popular holidays for sending out a card, but how can you resist when these stamps exist!
I purchased this Stamping Bella Goodluckabella stamp last year and I have been dying to use it ever since. As soon as I saw it, I knew I had to make a card with this stamp and Shamrock Green Flower Soft for the shamrock bucket. Don't ask me why, but that's what actually jumped in my head when I saw this stamp. I thought it would make a great congratulations, best wishes or good luck card.
Then Stampin' Up comes out with this fabulous "Go Green" sentiment stamp in their new mini catalogue. Well, you can understand how the temptation just overwhelmed me to make my first St. Patrick's Day Card and then it turned out to be my first easel card as well.
Along with the products already mentioned, we will be using Stampin' Up ribbon, CTMH Topiary Ink & Chocolate Marker, Bazzill & American Crafts brads, Queen & Company buttons, Prima Marketing flowers, embroidery floss, Scenic Route Ashville Patton Avenue Two-Sided Paper, Pebbles Inc. L'il Buddy Collection Bursts Two-Sided Paper, BoBunny Clover Double Dot Two-Sided Paper & Tapioca Bazzill paper.
You will also need a good pair of scissors & a little bit of patience because this Bella Stamp is paper pieced and not coloured with Copic Markers this time.
 Friday, February 05, 2010 - FULL
Time: 7:00 p.m. - 11:00 p.m. Cost: $20.00
This workshop is not quite full yet, so if you are interested in signing up or you would like more information, please contact me via email at ddigby@shaw.ca or drop by the store or give me a call at 344-7702.
For this workshop, we are using Fancy Pants Designs Frosted Two-Sided Papers: Snowball Fight, Bracket Snow, Winter's Chill & Hill of Snow with Worldwin's Black Cardstock.
The title is done with the Cricut Machine and the Alphalicious Font. I cut the title out in the black cardstock twice with the shadow short stack and then twice again with the Winter's Chill paper in just the short stack. All four layers were glued together to give a chipboard effect to the title.
All the photos are double matted and overlapping each other. There is a horizontal 4x6 photo, a vertical 3.5x5 photo, a horizontal 3.5x5 photo and a horizontal 2.75x3.75 photo.
For embellishments we will be adding four 1/2 inch mirrors to the layout, two Stamping Bella small crystal bonbons, glitter gluing small pearl beads wherever we see fit and adding a stamped winter word to the bottom right photo using CTMH Feathery Flakes stamp set, Lilac Mist Ink & sponge tool and Stampin' Up Night of Navy Ink.
The photo areas may look a little strange and that is because I covered the photos with white cardstock prior to shooting the layout. With the overlapping photos, this layout was too difficult to shoot without the photos already glued on. I limit the number of photos that I put out on the world wide web of my daughter and I didn't have permission from my cousins to put their children's photos on my blog. So, I covered their photos up. Having their photos up in my store is one thing, but the internet is a whole different ball game.

 Wednesday, January 13, 2010 - FULL
Time: 7:00 p.m. Cost: $7.00
Thank you to all the participants who signed up for this workshop without even seeing the card. Your confidence in my card designing is very flattering and hopefully I haven't disappointed you.
For this workshop we are using My Mind's Eye Beloved "Smitten Stripes" & "Fond Flowers" Two-Sided Paper with Red Rock & Vancouver Bazzill Paper. We will be using a medium corner punch from EK Success and distressing the edges with Tulip Ink from Close to My Heart.
We will be stamping with three different stamp sets from Close to My Heart: True Friends (January Stamp of the Month), February Word Puzzle & Happy Birthday and Stamping Bella's Jugglabella.
The Stamping Bella Stamp is coloured on Bella Cream paper with the following Copic Sketch Markers: E57 for her hair; N1, G24 & BG23 for her shoes, skirt & hearts; N0, YR61 & R32 for her blouse; E51 for undershirt; R00 for her skin and E09 for the space in between her legs so I didn't have to cut that out.
In the first photo of this card, you can see a bit of the Vancouver Bazzill paper sticking out. You pull on that and push down the card so that it is able to stand on it's own base. I received this style of card from one of my distributors for Christmas and immediately thought of the Jugglabella stamp and thought that this would be a great Valentine's Day Card.
Again, I apologize for the quality of the photo. I am having difficulties with the lighting in my house. I normally shoot my photos during the day, but I didn't have time today and I won't have time during the daylight hours to shoot this week. So, I figured that I would do the best that I can for the time being.
If you want to get a better look at my stuff and you live in the Thunder Bay area, all of my cards and calendar pages are on display in the store.
 Friday, November 13, 2009
Time: 7:00 p.m. Cost: $20.00
For this workshop, we used two sheets of pre-designed lay-out paper from an old Christmas line from Daisy Bucket. Actually, I am pretty sure that it was Daisy Bucket paper, but not absolutely positive. Every bit of scrap that I have left of it doesn't have a bar code left on them to be absolutely sure of the company's name.
I took the pre-designed layout paper and paper pieced them together to make the background paper my own. I cut the title Believe out on my Cricut machine, sewed on some clear glitter American Craft buttons with embroidery floss and there you have it.
I apologize for the photo quality. For those of you who are friends, family or close customers, you know that I have had a very rough year; especially since October to just lately. I quickly took this photo and didn't check the quality of it before adding my photos and gluing it to my calendar. From a distance, it looks okay. If you click on the photo to get a closer look, it is very blurry, but you can still get the idea of the page and that is what is most important. Fortunately, there wasn't a lot of small detail to check out on this layout.
 Friday, February 05, 2010 - FULL